Using CAMCAL
Before You Start
First, make sure everything is turned on. There are two plugs used in the back of the electrospray chamber—one to power the motor and one to power the USB devices.
Also, ensure that the computer you’ll be using is turned on. It could be any computer with CAMCAL installed, but the computer currently connected is the one to the right of the chamber on the ground.
Starting CAMCAL
-
Open the CAMCAL Calibration Software. It looks like this:

-
Resize the window to your preference. The camera feeds will grow with a larger window size, which may improve visibility and accuracy (you’ll probably have to increase both height and width to see a change.)
If you’d like, you can also put the app in fullscreen mode by right-clicking anywhere, then clicking “Go Fullscreen”.
First Time Use
Items in this section are saved to your device, so you shouldn’t have to change them after the first time, but in case you wish to again, here are the options.
Choosing camera sources
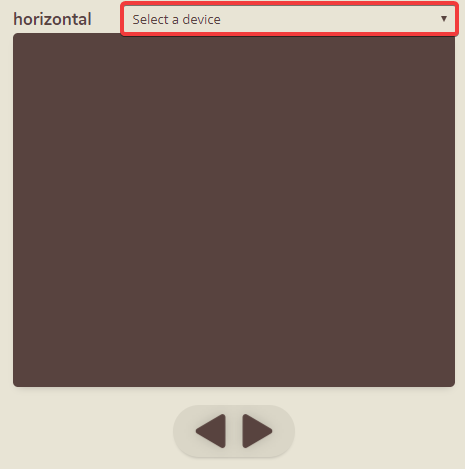
Above each of the viewer windows, you’ll notice a dropdown menu. This is where you can select the camera source for each of the viewers. This list will include all camera devices available, including any built-in webcam and the cameras plugged in inside the chamber.
The cameras you’re looking for are usually labelled USB Video Device in the list. Although they have the same name, each device has a numerical ID before its name that helps identify whether you have different devices selected.
Once selected, a camera source should appear quickly in the brown area below it. Problems? Read this.
Configuring movement
In the right click menu of CAMCAL, you can find configuration options for the software. The numbers have been selected to work pretty well, but if you’d like to change speeds, this is where to go.
You’ll have to do all following steps each time you use CAMCAL.
Connecting to the Controller
The first thing to do once cameras are working is to connect to the hardware. To do this, simply click click to connect at the bottom right.

It will then try to connect to the controller. (This button also contains device status messages.)
Once it lets you know that it’s connected, you’re ready to move on.
If you fail to connect, see this.
Camera Placement
The cameras are purposefully free-floating (not permanently attached anywhere) so you can place them where it’s most convenient for you at any given time, and remove them once you’re done calibrating. That said, feel free to add some sticky putty or permanently attach them somewhere if you find a spot you particularly like.
Make use of the software tools
CAMCAL has some helpful camera manipulation tools built in to help you improve the image digitally. This includes pan, zoom, and rotation of each camera feed…
Recommended placements
Although you’re encouraged to try different locations, here are a few that work especially well.
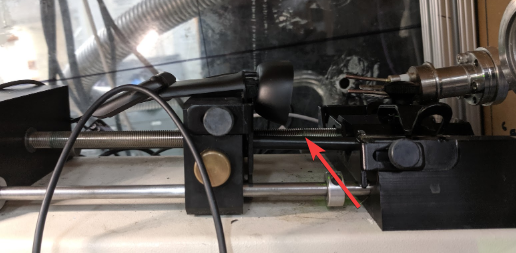
POV view from the center clasp. Line it up to show the end of the needle, and clip the camera handle’s lip into the clasp. when you move, the camera will follow the needle instead of the tube.
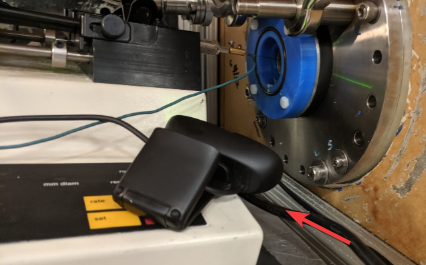
Side view resting on the platform. Place it upside down on the platform (you’ll have to rotate it in the software) to get a great side view. Use the cable to hold it in place, as seen in the image above.
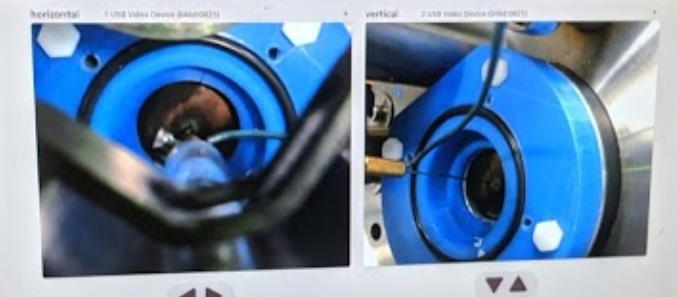
With these two views (after some panning and zooming), you’ll get something like this:
Focusing the cameras
Both cameras are manual focus. Although they have a small aperture (meaning most things should be in focus most of the time), you may sometimes need to change the focus. Luckily, this is very easy.
Simply turn the focus ring (pictured below), the small black wheel around the camera lens, to adjust the focus. When facing the lens head-on, turn it:
- counter-clockwise to bring the focus closer to the lens.
- clockwise to bring the focus further from the lens.

Moving CAMCAL
Here we are at the most important part: calibrating. Use the arrow keys on screen to move the platform. Tap an arrow to move the specified step amount, and hold an arrow to move continuously (at the specified speed). You can also use the arrow keys on the keyboard to do the same.
Any other motions you can do with your hands, but feel free to reference the camera feeds as you move it—they may be very helpful.
The Release Button

As CAMCAL uses stepper motors, one of the things the motor can do is hold its position very accurately. However, the motor tends to heat up while holding position—not close to dangerously so, but probably not something you’d want to leave on for days at a time. In addition, if temperature is important to the experiment, and there is not an alternate form of cooling, this heat could interfere.
Whenever a motor is holding position as mentioned above, the red RELEASE button will be visible. Click this button at any time to release the motor from holding.
Luckily, CAMCAL can hold position quite well without any motor power, due to the low slope ACME screw and spring underneath the platform. You should have no problems releasing the motor once it’s been placed in the correct position.
Warning: Restarts!
Beware! If you happen to restart the CAMCAL software, the motors will continue to hold even after the software is closed. When restarting the software, the release button will not reappear until you press one of the arrow keys.
If you very much do not want to move the motor or reopen CAMCAL, you can also release the motors by power cycling the power strip inside the chamber.
Hopefully all of this information has been helpful! If you didn’t find what you were looking for here, please check out the other pages and see if what you need is hiding somewhere here.